The Checklist activity is an activity which allows teachers to create a to-do list for students to work through and monitor progress as students complete items on the list. Teachers can add tasks that students may check off, create a Checklist and allow students to add tasks to it, and have Moodle automatically populate the Checklist with activities and resources from the course. Teachers and students can see a progress bar showing what has been accomplished.
Add a Checklist
1. On your Moodle course, click Turn editing on.

2. Click +Add an activity or resource in the section where you want to add a Checklist.

3. In the Add an activity or resource window, select Checklist. The Adding a new Checklist page will open.

4. Enter a name for the activity in the Checklist field (required), and provide instructions in the Introduction field (optional).

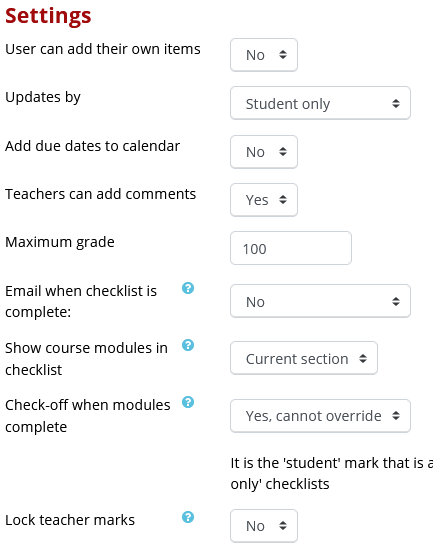
5. Configure the Settings for the Checklist.
- User can add their own items: Choose Yes or No to decide whether students can create sub-tasks under the items you add to the checklist.
- Updates by: Determine who can update the checklist (Student only, Teacher only or Student and teacher. Note: The Student and teacher option requires teachers to confirm student input.)
- Add due dates to calendar: Adds due dates to the Calendar for any items created manually within this Checklist.
- Teachers can add comments: Allows teachers to add personalized comments on students' individual checklist items.
- Maximum grade: If you want to make the checklist ungraded, set this value to zero (0).
- Email teachers when checklist is complete: This option send an email to the student and/or teacher when the checklist is marked as complete.
- Show course modules in checklist: Adds activities and resources from the current section or entire course and adds a link to each item. Note: If you later add additional activities or resources to the section (or course), the new items will automatically be added to the list. If No is selected, the next item is grayed out.
- Check-off when modules complete: Choose Yes, cannot override.
- Lock teacher marks: When this setting is enabled, once a teacher has saved a Yes mark they will be unable to change it.

6. Click the Save and return to course button at the bottom of the screen when finished.

7. The Checklist activity will appear in the section to which it was added.

