Audio can be used within composite H5P content types or as a standalone audio player. Whether audio is used within a composite content type or standalone H5P content, the options below are the same. Audio file types accepted: .mp3 and .wav
H5P Audio is only used after an audio file has been created. You can create audio using H5P Audio Recorder, Audacity (NOTE: Audacity is not supported by DL but available through UL Software center) or any other audio creation software available.
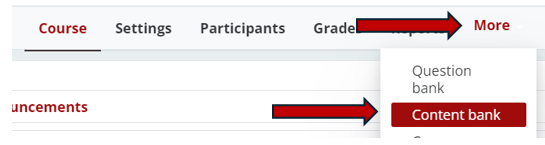
Step 1 - Log into Moodle, in the Contextual menu, select More and find Content bank.
Step 2 - Once in the Content bank page, Add Audio from the list of content types

Step 3 - Give your audio file a meaningful title, select Source Files to upload an audio file or copy and paste an audio link.

Step 4 - Player mode is how the audio player will display.

Step 5 - Save and preview. If the audio player is within another content type or standalone, it can be moved to a desired location or resized (Full only).
Return to H5P Content Tutorials